

The overview of a 12 V system tours the yard in a paragraph. This is the long version: the eight parts of a yard that usually get lit, taken one at a time — which light suits each, how many, where exactly it goes, and the mistake that shows up there most. The paths come first, because from November to March they are what gets used in the dark; trees and walls come after.
Treat the counts and spacing here as layout starting points. Confirm the exact fixture, approved mounting location and power supply, then test at night before drilling or burying cable. Dedicated-power kits are not automatically compatible with the main landscape circuit.
- Test the spacing 6–8 ft is a trial interval, not verified coverage
- 1–2 spotlights for a tree: one if narrow, two if wider than tall
- Top + bottom the steps to light if only some of them get a light
On this page
The front walk
The walk is used every night of the year, and it is the first thing to light.
- Light Path lights, 3 W, with a hood that puts the light on the ground rather than in your eyes.
- How many A trial 32-foot layout with positions at both ends has five lights at 8-foot intervals. Confirm coverage with the actual fixtures after dark; change the count or spacing if needed.
- Where From where the walk leaves the drive or the sidewalk to the foot of the steps. With lawn on one side and a bed on the other, put them in the bed, where the mower never goes.
- Side paths Identify entrances, turns and level changes first. Place lights temporarily, then check the route after dark and fill any gaps using the actual fixtures.
The usual mistake
Spacing the lights to fit the box instead of the walk. Path lights come in packs of 4, 6 and 12, and six lights stretched along a 60-foot walk leave 12 feet between them — separate pools of light with dark ground in between. Count from the walk, then buy the packs that add up to it.
Which path light suits which walk is in Best Path Lights for a Front Walk.


The driveway
Headlights light a driveway. What they do not show is where it starts and where people step out of the car, and that is usually all a drive needs.
- Light Path lights, or the lowest, sturdiest fixture you have; anything near a drive gets hit.
- How many One on each side of the mouth of the drive, where it meets the street, and one where the walk branches off. A long drive gets one at each bend.
- Where Back from the edge, far enough that tires and the mower miss them. If you plow, keep lights off the side the snow gets pushed to.
The usual mistake
Lining both sides of the whole drive. It lights asphalt that nobody needs to see, and the walk to the door, which somebody does, is still dark.
Lights for the walk and the drive: pathway and driveway.
Steps
A light on a step shows where the edge of each tread is, which is the whole job. Light the treads from the riser or the side; the fixture depends on what the steps are made of.
- Deck stairs Choose a fixture approved for the riser, stringer or rail. Our 2.5 W Half-Moon rail light differs from the Recessed Deck Light 16-Light Kit; the recessed kit runs separately on its included 12 V DC supply.
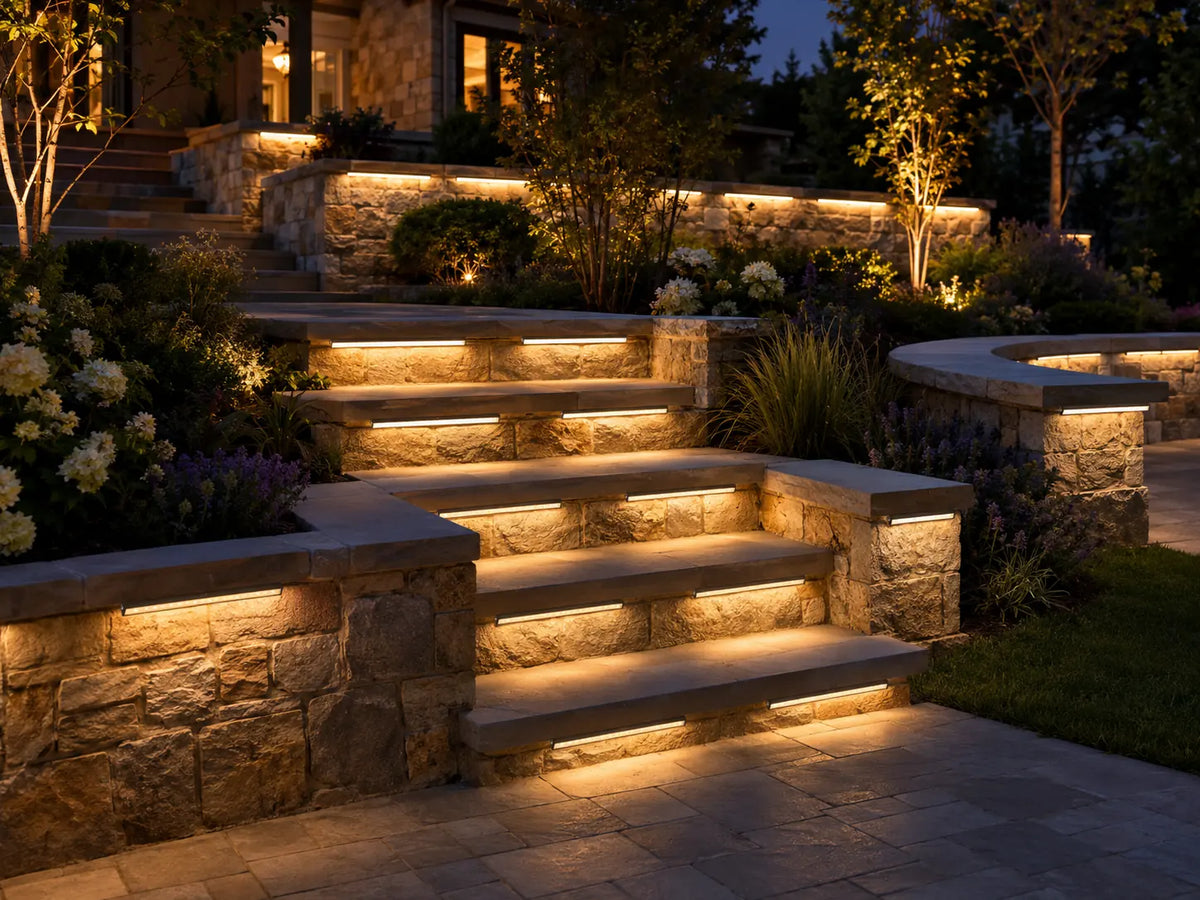
- Stone and concrete steps A hardscape light under the lip of each tread, where it overhangs the riser. The light falls onto the step below, and the fixture stays out of sight. 3 W each.
- Stairs with a railing A rail light on the posts lights the treads beside each post.
- How many A light on every step, or on every second step when the flight is long. If only some steps get a light, make it the top and the bottom ones — those are the steps people miss.
The usual mistake
A fixture that shines up the flight. Walking up, you look straight at the risers, so a bright, open face in each one is glare at every step. Choose a light that sends its light down — a hooded or half-moon face — and the tread is lit while the person climbing is not.
Lights for steps, decks and patios: patio, deck and steps.
Trees
A lit tree is what makes a yard look lit from the street, and it is where one light, well placed, beats several. How to stake and aim it has its own page, how to uplight a tree; this is which trees and which light.
- Which trees The one or two you see from the windows you use after dark, or from the street as you pull in. A tree nobody looks at at night does not need a light.
- Light A spotlight on a stake, 5 W. In a lawn, where a stake would be in the mower's way, an in-ground light in the same spot sits flush with the grass.
- How many One for a narrow tree, two for one that is wider than it is tall.

Trees in a bed, lit from below. One or two lights on the trees you see from the house.
The usual mistake
Setting the light for the tree as it is this year. A young tree's canopy spreads, and a stake that was in the right place at planting is too close to the trunk a few summers later. Move it out as the tree grows; the loop of slack cable left at the fixture is what lets it move without a new joint.
Lights for this part of the yard: trees and garden beds.

The front of the house
Light on the house itself is what gives it shape at night: a few tall washes of light on the wall, with dark between them.
- Light An in-ground light set at the foot of the wall, 12 W, or a spotlight in the bed, 5 W, where there is soil to stake it in.
- How many Start with the corners and the entry. On a long front, add one between each pair of windows.
- Where Between windows, not under them — under a window the light lands on the glass and shines into the room. Close to the wall, the light grazes it and brings out stone or brick; a little farther back, it washes smooth siding more evenly.

Lights in the bed at the foot of a stone front, grazing the wall.
The usual mistake
Lighting the garage door. It is the biggest flat surface on most fronts, and once it is lit it becomes what the house is about. Leave it dark and light the wall on either side, or the entry.
Lights for this part of the yard: facade and foundation.
Walls and fences
Retaining walls, seat walls and fences are lit from the top down: the light sits under the cap or on the post and falls down the face.
- Light Hardscape lights under the cap of a stone or block wall, 3 W; rail lights on fence and deck posts, 2.5 W.
- How many Enough that the pools of light on the face just meet. At dusk, with the run on, try two under the cap, slide the second along until its light touches the first, and repeat that gap along the wall.
- Where Under a cap that overhangs the face, so the fixture is hidden and only the light shows. On a fence, on the posts that face the path or the patio.

Lit from under the cap, the face of the wall shows its stone and the fixtures stay hidden.
The usual mistake
Spotlights in the lawn aimed at the face of a retaining wall. They show every stain on the block and shine straight at anyone walking toward the wall. Lit from the top, a wall looks built; lit from the front, it looks floodlit.
Lights for this part of the yard: fence and retaining wall.
The patio and deck
Where people sit, the light should be low, warm and mostly at the edges. The table does not need landscape lighting; the way to it and the way off it do.
- Light Rail lights on the deck posts, recessed lights in the rim of the deck and the risers of its steps, hardscape lights under the cap of a seat wall.
- How many Enough to show the edge of the deck and every change of level, and no more.
- Where On the vertical faces — posts, rim, risers, the underside of a cap — so the light crosses the floor. A light set flat in the boards shines up at whoever is standing over it.

Under the cap of a seat wall: low, warm, and at the edge.
The usual mistake
Lighting the deck and not the steps down from it. Those steps are the part people use in the dark; light them first, as in steps above.


Ponds and fountains
Underwater light is the one part of the yard that does not join the main run.
- Light A pond light kit — sealed lights on one cable, with their own small transformer, photocell and timer.
- How many One or two on each thing worth seeing: the falls, the jet of a fountain, the plants on the far bank.
- Where Under the surface, aimed away from where you sit, so you see what is lit and not the lights. A waterfall lit from below the drop, through the falling water, is the classic.
- Power Because the kit brings its own transformer, it plugs into its own outdoor GFCI outlet and keeps its own schedule. Leave pond lights out when you size the main transformer.
The usual mistake
With a color kit, running the colors every night. Most evenings a pond looks best in warm white; the colors are there for the nights you want them.
Lights for this part of the yard: pool and pond.
Then count it
Few yards need all eight. Pick the parts you walk through and look at after dark, leave the rest unlit, and Plan my yard turns the list into a fixture count, a transformer size and a length of cable.
Questions people ask
Where should landscape lights be placed?
Where people walk after dark and where they look. The walk, the steps and the mouth of the drive come first; then one or two trees and the front of the house; walls, the patio and the pond after that. Few yards need all of them.
How do you light a retaining wall?
From the top: hardscape lights under the cap, spaced so the pools of light on the face just meet. Spotlights aimed at the face from the lawn show every stain on the block and shine into the eyes of anyone walking toward the wall.
How do you light outdoor steps?
Light the tread edges with fixtures approved for the mounting surface. Test every step for visibility and glare before fixing a count or spacing. For the recessed 16-light kit, use the included 12 V DC supply and follow its cutout and clearance instructions; it is not a 2.5 W fixture to splice into the path-light cable.
Do pond lights run on the same transformer as the other landscape lights?
Ours do not. Each pond light kit comes with its own transformer, photocell and timer, and plugs into its own outdoor GFCI outlet. Leave pond lights out when you size the main transformer.
Still deciding what your yard needs? Email hello@hiboitec.com with the parts of the yard you want to light. We reply within one business day.


